Windows 10 Fall Creators Update (1709) destroys Linux Partitions

It was time for me to do the Fall Creator Update to Win10 1709 from my current Win10 1607 installation that i use on my dualboot system together with Fedora 27. And because it is a big update, i decided to do some preparations. I made backups of everything including the disk layout and updated with a flash drive like Microsoft described it here.
The Update itself worked pretty well, after i made sure that Windows is the default UEFI boot entry. No major error and the new Windows features worked immediately.
But: Now Linux was not able to boot.
Usually this is nothing special, it is well known that after big Windows Updates or Installations you have to reinstall GRUB (or whatever bootloader you are using). I am used to this in my >15years of Windows-Linux-Dualboot experience.
But this time it was special.

Lets see what happened… this was the partition layout before the Update (fdisk):

Gerät         Anfang      Ende  Sektoren  Größe Typ
/dev/sda1       2048    534527    532480   260M EFI-System
/dev/sda2     534528    567295     32768    16M Microsoft reserviert
/dev/sda3     567296 265443327 264876032 126,3G Microsoft Basisdaten
/dev/sda4  265443328 266364927    921600   450M Windows-Wiederherstellungsumgebung
/dev/sda5  266364928 268462079   2097152     1G Linux-Dateisystem
/dev/sda6  268462080 537234734 268772655 128,2G Linux-Dateisystem

Here the UUIDs of the Linux partitions with blkid:

/dev/sda5: LABEL="Fedora-Boot" UUID="5bed5e31-25a0-4446-8557-285098cc5812" TYPE="ext2" PARTUUID="826dae72-36a5-408a-89f6-8a16e2906fca"
/dev/sda6: UUID="64725166-1b67-4393-aa3c-b4097e3c869a" TYPE="crypto_LUKS" PARTUUID="3cc18e74-de0b-4e2e-a906-b7328136f737"

And here the partition layout after the Update (gdisk):

Number  Start (sector)    End (sector)  Size       Code  Name
1            2048          534527   260.0 MiB   EF00  EFI System Partition
2          534528          567295   16.0 MiB    0C01  Microsoft reserved ...
3          567296       264405092   125.8 GiB   0700  Basic data partition
4       264407040       265441279   505.0 MiB   2700
5       265443328       266364927   450.0 MiB   2700
6       266364928       268462079   1024.0 MiB  8300
7       268462080       537234734   128.2 GiB   8300

And the UUIDs of the Linux partitions with blkid (it is sdb because its from a booted live system):

/dev/sdb6: PARTUUID="826dae72-36a5-408a-89f6-8a16e2906fca"
/dev/sdb7: PARTUUID="3cc18e74-de0b-4e2e-a906-b7328136f737"

Here we can see that Windows Update shrinked the sda3 partition (Windows C: drive) and created a new Recovery Partition in the resulting space (even thought that we already have one). The Linux Partitions in the Partitiontable did not get touched, their start- and end-sector and PARTUUID are the same. The Linux stuff in the EFI partition is also still present and the Linux Boot entry in the UEFI is still there.
But the UUID, the label and the filesystem type of both partitions vanished. Those information belong to the Filesystem itself and are not part of the partitiontable, they are on the partition itself.
Windows Update destroyed the Linux Partitions. It did overwrite the Filesystem there. The 1GB partition had an ext2 filesystem of /boot and the 128GB partition was an LUKS encrypted partition. Both were wrecked and completely useless now. There was no way to even mount those partitions in a booted live system and no way to repair them (it always complained about brocken superblock and the BackUp superblocks didn’t work either), the data on them was completely lost.
The only way to repair it was with formatting those partitions again and restoring from full backups.
Configure OpenVPN with the KDE connection editor

Some VPN providers like NordVPN already provide OpenVPN configuration files (*.ovpn). The configuration files for NordVPN can be downloaded here.

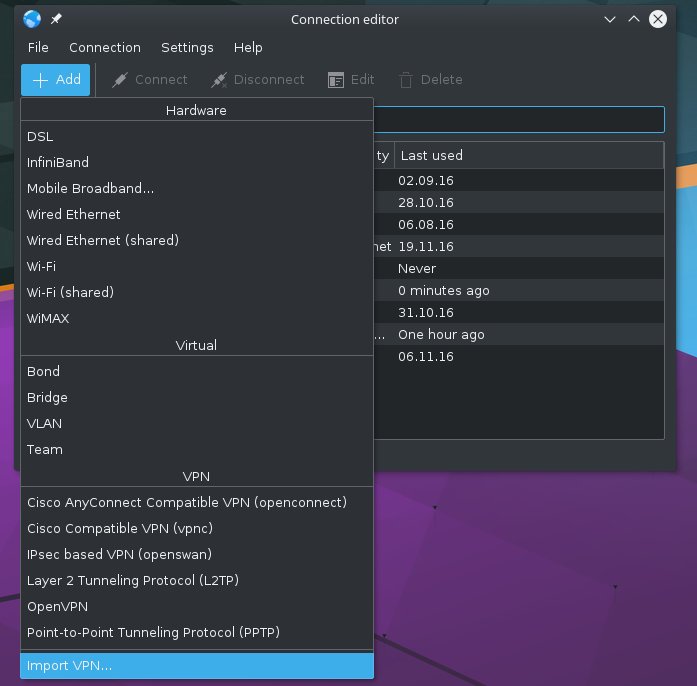
This is the easiest way to configure a VPN. Just download the .ovpn files. Open the KDE Connection Editor, Add a new Connection an click on “Import VPN”.
vpn1
Select one of the .ovpn files you downloaded, click OK, and if it asks you if you want to add the certificate, click Yes.
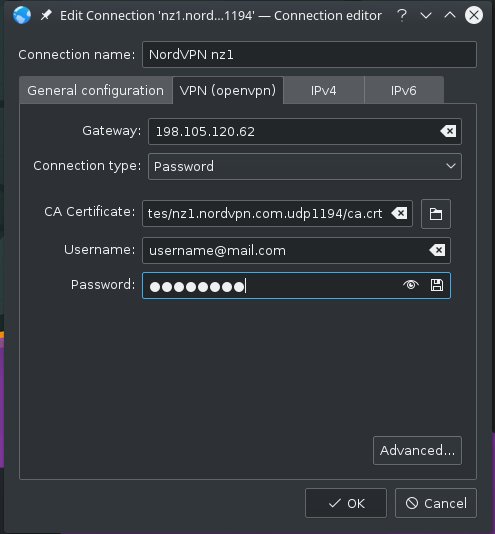
Edit the new VPN-Connection, change the connection name and enter Username and Password of your Account (if you can’t enter your password, click on the symbol to the right of the eye in the password-field, it maybe is set to “Ask for password every time”).
vpn2

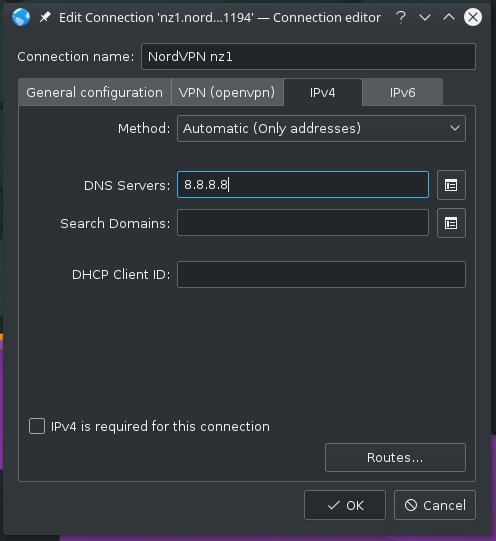
Sometimes you have to change the Settings in the IPv4 Tab too — this depends on your Distribution.
You will have to change Method to “Automatic (Only addresses)” and manually set the DNS-Server (8.8.8.8 is the Google DNS-Server, you may want to use another one).
vpn3

Now your VPN should work 🙂

Backup NTFS-Partition from within Linux

This is a brief overview of some options you have if you want to backup your windows partition. There are lots of (commercial) tools out there to do that task, but basically they all work with one of the following principles.

Full partiton backup (dd):

dd if=/dev/sda1 of=./backup.img bs=1M

dd copies every single bit of the partition. That means that the backup-file is as big as the partition itself (but of course you can compress it with e.g. bzip) and it takes a long time create. But dd doesn’t care about the filesystem, so you don’t have to worry about bootsectors or (not well documented) hidden stuff or attributes and you can mount the image with ‚mount -o loop ./backup.img /mnt‘ if you just need some specific file of the backup.

Full partition backup (ntfsclone):

ntfsclone /dev/sda1 ./backup.img

ntfsclone works like dd, but instead of copying everything, it checks if a disk sector is actually used, and if not, it will skip it. The resulting backup-file will be a sparse file.
ntfsclone is faster than dd, because if only 10% of the partition is used, it will just copy those 10%.
If you use the –save-image flag, it will creat a special image file and not a sparse file (you can use that, if you don’t have a filesystem with sparse-file-support).
You can mount a sparse file exactly like a dd-image-file, but not an special image file.

If you want to backup the windows system-partition, dd and ntfsclone are the only reliable options you have, because they dont really care about the filesystem, they will copy every strange exotical file attribute, junction point, symlink, permission and bootsector.
But they have one big disadvantage: If you already have a backup-file, you can not just ‚update‘ it or copy just the changed parts, you have to copy everything again.

Rsync-Backup:

rsync is the best backup and syncing solution for Linux, it’s fast and it will only copy the changed parts of changed files – it’s perfect if you already have a backup and you want to „update“ it, so why should we not use it in ntfs-filesystems?

First lets make sure where to save the backup, you could create a ntfs-partition on the backup-drive, you could use an existing image-file or you could create a new one with ‚fallocate -l 50G ntfs-image.img‘ (this file will be 50GB big) and ‚mkfs.ntfs ./ntfs-image.img‘. You can mount the image wth ‚mount -o loop ./ntfs-image.img /mnt/backup‘.

Now we have to make sure to have access to every data we can (savely) get out of our ntfs-filesystem, like extended attributes.
NTFS-3g (our linux-ntfs-implementation) needs to know how it should map the attributes, so we have to create a textfile .NTFS-3G/XattrMapping in both, our ntfs-partition and our (ntfs-formated) backup-partition (or image-file). Here is an example XattrMapping-file:

system.ntfs_attrib:user.ntfs_attrib
system.ntfs_times:user.ntfs_times
system.ntfs_reparse_data:user.ntfs_reparse_data
system.ntfs_acl:user.ntfs_acl

Quick expanation: ntfs_attrib are attributes like hidden-file, ntfs_reparse_data is used by symlinks and junction points, ntfs_acl is the Access Control List.

Next we have to (re-)mount the partition with

mount -t ntfs-3g -o user_xattr,streams_interface=xattr,efs_raw /dev/sda1 /mnt/ntfs-partition
mount -t ntfs-3g -o user_xattr,streams_interface=xattr,efs_raw /path/to/ntfs-image.img /mnt/backup

user_xattr and streams_interface=xattr should be enabled by default, but i still use it, just to make sure. efs_raw is needed for encryptet files (you can’t decrypt it, but you can copy the raw file). Here are the mount-options explained: CLICK.

Now we are ready for the backup:

rsync -aHXv --inplace --no-links --delete /mnt/ntfs-partition/* /mt/backup/

-H for Hardlinks (a „Hardlink“ is basically a file with two filenames), -X for extended attributes

This command will NOT backup symlinks (–no-links) and junction points – NTFS-3G interprets junction points as symlinks and it will not work if you just copy them. It would be possible if you have access to the proper ntfs_reparse_data extended attribute and fiddle around with it, but i think it will be way more reliable, if you just make your first backup with dd or ntfsclone and use rsync to update that image from time to time (but this will still be no accaptable solution for the windows system-partition, you will have to use dd and ntfsclone on every backup there).

Backup-Applications:

There are some backup-solutions out there like fsarchiver, but if you want to use those, you have to check if they have proper ntfs-support and if they are suitable for the system-partition of your windows-version. If they work at block-level (like dd and ntfsclone), you don’t have to worry about that, but fsarchiver works on filesystem-level (like rsync) and the ntfs-support is just experimental.

Split Pages of a scanned (2 pages per sheet) Book

Lets assume that you scanned a book and now you have a PDF with 2 pages per landscape-sheet.

There are many possible ways to split the pages, like scantailor.
But here i want to post a solution with pdfutils and imagemagick:

  1. Convert the PDF to a bunch of image-files (one per sheet):
    pdftoppm filename.pdf images
  2. Split the image-files:
    convert -crop 50%x100% images* +repage outputname_%d.tiff
  3. Rename the 0,1-9 files to 00,01-09:
    rename 's/outputname_(\d)\./outputname_0$1\./' outputname_*tiff
  4. Convert the image-files to PDFs:
    for file in *tiff; do tiff2pdf -z -p A5 -F $file -o $file.pdf; done
  5. Join the PDF-files:
    pdfjoin outputname_*.pdf

The final PDF will be called outputname_XX-joined.pdf

Duplex-Printing Tricks and Linux (Booklet)

Lets say you want to have multiple pages on one side of the paper or you want to print a booklet – you could use the printing-dialog (if it provides the options you want and doesn’t mess up the whole thing), or you could modify the pdf with pdfjam (part of the package pdfutils).

Sometimes, examples are the best way to explain something:

  • 4 pages on one sheet:
    pdfnup --nup '2x2' filename.pdf
  • 4 pages per sheet with space between each other:
    pdfnup --nup '2x2' --delta '0.5cm 0.5cm' filename.pdf
  • 4 pages per sheet, scaled to 80% and with offset
    pdfnup --nup '2x2' --offset '1cm 0.5cm' --scale '0.8' filename.pdf
  •  8 slides of a 4:3-presentation per side:
    pdfnup --no-landscape --nup '2x4' filename.pdf
  • 8 slides of a 4:3-presentation per side which are orientated in columns:
    pdfnup --no-landscape --nup '2x4' --column 'true' filename.pdf
  • Create a booklet:
    pdfbook filename.pdf
  • Create a 90 degrees turned booklet:
    pdfbook --no-landscape filename.pdf

Note:  The booklets are supposed to be printed in long-edge duplex mode, if you don’t want that, use ‚–shorte-edge‘ as first argument in pdfbook

Duplex-Printing-Option disappears in Linux (Evince)

If you have a printer which is able to print on both sides, it is a common problem that the Duplex Option in the printing-dialog magically disappears or isn’t there at all.
And there are many possible reasons for that.

First, make sure that CUPS knows that the printer is able to print duplex, you can check that with lpoptions -l
If the DuplexOption (or whatever it is called) is set to False, correct it:

lpoptions -o OptionDuplex=True

Now that CUPS is OK, lets check the appropriate client.
Some printers aren’t able to print duplex with specific paper-sources (like „A4 Borderless“) and if you select that, the Duplex-Option vanishs and does not come back (which is obviously a bug).
To fix that, try to print some paper with normal A4 and hope that next time you open the printing-dialog the DuplexOption appears.
If that does not work, have a look at the specific options of the application.

For Example, Evince:
There’s a config file for the printing-dialog of evince:

cat .config/evince/print-settings | grep Duplex

Make sure that the Duplex-Options are set to „True“ or remove that file at all.

And finally: If nothing works, try to reinstall the printer.

gscan2pdf: Brighten up „grey“ scans

gscan2pdf is a great tool for scanning a huge amount of pages, and it also includes OCR.
But for some strange reason, my scanner produces pages, which are way to dark and what should be white, is grey.

Gscan2pdf does not have adjustable brightness or contrast, and editing the scans in gimp is just to much work.

And thats where some great cli-tools like imagemagick show their strength 🙂

But before i could use that, i had to deactivate the grey-filter in the Scan/Pagesettings/Options/Filter, because that thing just creates strange looking grey boxes around the text.

Now to the imagemagick part:
The description of the convert-command can be found here:
http://www.archivscan.ch/IT/ImageMagick/ImageMagick_helligkeit_kontrast_gamma_farbsaettigung.php
Just add the command (like „convert %i -brightness-contrast 0x24 %o“) as a tool in Edit/Settings/GeneralOptions and after the page is scaned, click on Tools/Custom/convert…

Edit ics calendarfiles with bash-scripts and sed

Sometimes you get group-calendars as .ics-file, but you don’t want to import the whole thing in Outlook/Thunderbird/OwnCloud or some appointments in the file are simply wrong. (happens to me at university once in every term).

Here are a few sed-commands for specific tasks:

Rename events from OLDNAME to NEWNAME (pretty easy):

cat file.ics | sed 's/SUMMARY\:OLDNAME/SUMMARY\:NEWNAME/'

Delete all events named NAME:

cat file.ics | sed 's/END\:VEVENT/END\:VEVENT\>/g' | sed 's/BEGIN\:VEVENT/\<BEGIN\:VEVENT/g' | \
sed ':a;N;$!ba;s/<BEGIN\:VEVENT[^>]*NAME[^>]*>//g' | \
sed 's/END\:VEVENT>/END\:VEVENT/g' | sed 's/<BEGIN\:VEVENT/BEGIN\:VEVENT/g'

Change all events named NAME and beginning at 06:15am and ending at 07:00am to 06:00am – 07:00am (time is in format HHMMSS):

cat file.ics | sed 's/END\:VEVENT/END\:VEVENT\>/g' | sed 's/BEGIN\:VEVENT/\<BEGIN\:VEVENT/g' | \
sed ':a;N;$!ba;s/\(<BEGIN\:VEVENT[^>]*NAME[^>]*DTSTART[^T>]*T\)061500\(Z[^>]*DTEND[^T>]*T\)070000\(Z[^>]*>\)/\1060000\2070000\3/g' | \
sed 's/END\:VEVENT>/END\:VEVENT/g' | sed 's/<BEGIN\:VEVENT/BEGIN\:VEVENT/g'

Delete all events named NAME and with the time 06:00am – 06:15am:

cat file.ics | sed 's/END\:VEVENT/END\:VEVENT\>/g' | sed 's/BEGIN\:VEVENT/\<BEGIN\:VEVENT/g' | \
sed ':a;N;$!ba;s/\(<BEGIN\:VEVENT[^>]*NAME[^>]*DTSTART[^T>]*T\)060000\(Z[^>]*DTEND[^T>]*T\)061500\(Z[^>]*>\)//g' | \
sed 's/END\:VEVENT>/END\:VEVENT/g' | sed 's/<BEGIN\:VEVENT/BEGIN\:VEVENT/g'

To learn more about the power of sed, go to this site:
http://www.grymoire.com/Unix/Sed.html
THX to the writer 🙂

Set the Clock on a Dual-Boot-System with Windows

The Operating System gets the current time from the Hardware-Clock during boot.
The problem with that: Windows expects the hardware-clock to be in the time of the current timezone, while Linux (and every other OS) expects the time in UTC.

Now you have two choices:

  • tell Windows that the hardware-clock is in UTC, or
  • tell Linux that the hardware-clock is in localtime

Since having the hardware-clock in UTC is standard, i recommend to change the settings of Windows.
And this is how its done:

  1. Set the correct time in Linux and write it to the hardware-clock:
    #date -s HH:MM:SS
    #hwclock --systohc
  2. Boot Windows (now it should display the wrong time in Windows)
  3. type ‚regedit‘ in the Run-Prompt of the Start-Menu (or Alt-F2)
  4. go to HKEY_LOCAL_MACHINE\SYSTEM\CurrentControlSet\Control\TimeZoneInformation\
  5. Create a new DWORD-item (right-click\New) and name it RealTimeIsUniversal
  6. Give it a hex value of ‚1‘
  7. restart

Done 🙂

HowTo: Successfully write a tar-command without failing 37-times

A tar-command is one of the most difficult things to remender and ‚tar –help‘ is not very useful. Even xkcb wrote a comic about it:

So: How can i remember these commands? … ok… i think for the moment it would be a great start if we could remember the commands for extraction.

First you should know that tar is just a file format for archives, tar itself has no compression, its just a file that contains other files.
The compression is applied after the archive is created, that is the reason for the (widely used) second fileextension: tar.bz, tar.gz, tar.bz2, etc. <- The second extension tells you which compression is used. If there is no second fileextension, then there is no compression.

The basic for file-extraction is:

tar xv

x for extract and v for verbose (print more infos, like the filenames)

Now lets look at the flags for the compression modes:

  • .tar.bz2 / .tbz = j
  • .tar.gz /.tgz = z
  • .tar.xz = J
  • .tar = none

And if your tar-archive is a file, which is the case in 99,99%, you must add f (for file) followed by the filename.
Now you can type the tar-command in its whole beauty:

#tar xvjf filename.tar.bz2
#tar xvzf filename.tar.gz
#tar xvJf filename.tar.xz
#tar xvf filename.tar